

How To Clean An Audio File Of Background Noise With Audacity
How to Remove Background Noise from Audio and Video [3 Easy Ways]

Edited by
August 10, 2022
If you've ever recorded video or audio, you're probably all as well familiar with the problem of background racket. Whether you lot're making a family unit motion picture or recording a street interview using a microphone, the resulting footage volition probable contain unwanted sounds: breathing, random voices, traffic racket, and other ambient sounds, or various hums and buzzes caused by mic defects.
If you notice your video or audio has unwanted background noise, there's no demand to throw your work into the garbage. At that place's plenty of audio noise reduction software on the Internet! In this article, we'll embrace the iii most common ways to remove background racket from video and audio: using a desktop video editor, sound-editing program, and online audio dissonance reduction tool.
Remove background noise from audio and video on Windows/Mac
There are many audio-editing programs that can help you with background noise removal. In this department, nosotros'll depict how to remove background dissonance from a video using two apps: Adobe® Audition® and Movavi Video Editor Plus.
How to reduce noise in a video using Adobe® Audience®
The beginning racket-cancelling software we're going to cover is Adobe® Audition®. Information technology's professional person software for audio recording and editing. Check out the guide below to learn how to remove background noise using Adobe® Audience®.
Step 1. Open your audio file in the plan and click Effects. Select Dissonance Reduction / Restoration so Noise Reduction.
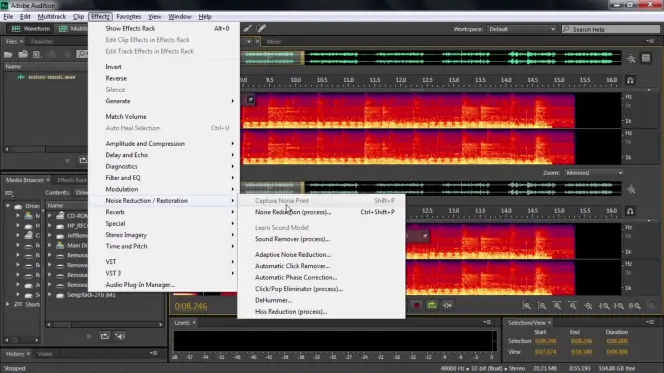
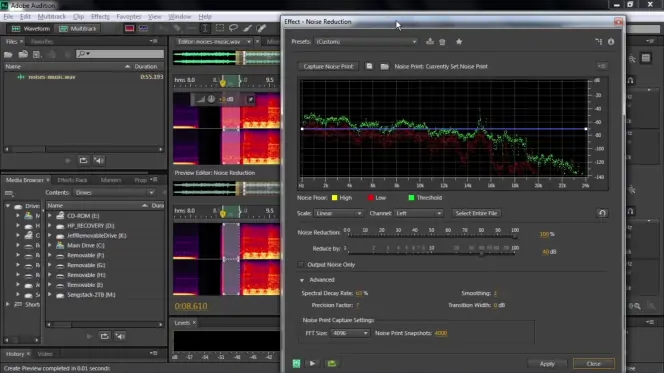
Step 2. Select the sample and click Capture Noise Impress. Arrange the Noise Reduction and Reduce By sliders as needed.
How to remove groundwork dissonance from audio with Movavi Video Editor Plus
Movavi Video Editor Plus is an efficient video-editing app for Windows and Mac that can also be used equally sound noise reduction software. The interface of the program is elementary and intuitive, so noise removal in this audio and video editor volition exist easy fifty-fifty for beginners. The guide below explains how to get rid of background dissonance with Movavi Video Editor Plus.
Step 1. Install Movavi Video Editor Plus
Launch the program file y'all've downloaded and follow the installation instructions.
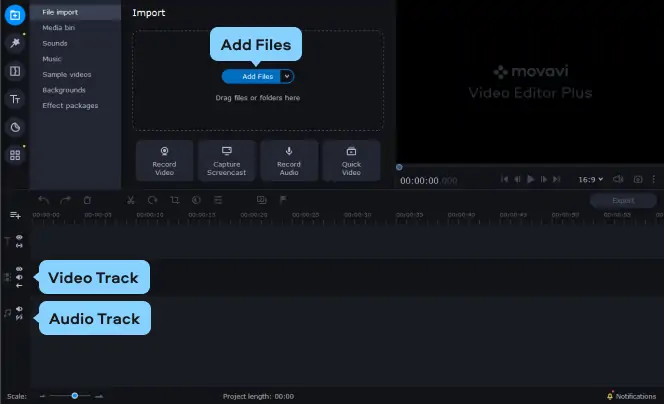
Footstep 2. Upload media files
Click the Add Files button and choose the video and/or audio file you lot desire to fix. Drag the video onto the Video Track and the audio onto the Sound Runway on the Timeline.
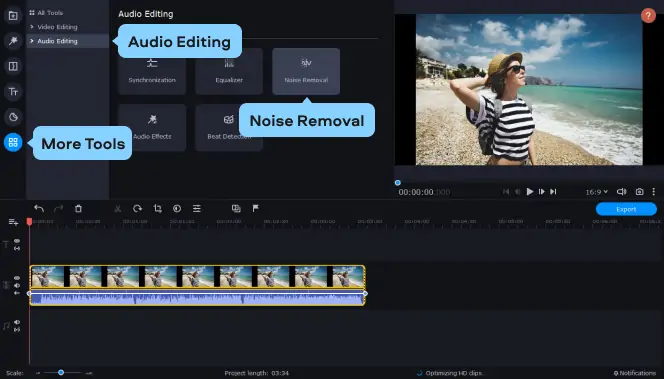
Step 3. Adjust noise reduction settings
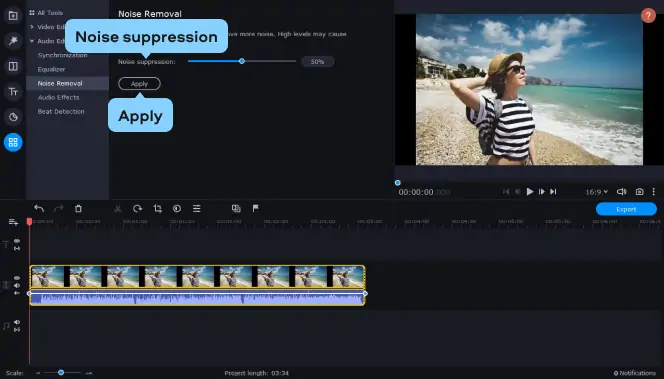
To access the audio denoise function, click More Tools. Open Audio Editing and select Noise Removal.
To eliminate unwanted noise from your recorded fabric, adjust the Noise suppression slider and click Employ. Experiment with different slider values until you lot get the best results; be aware that higher levels of dissonance suppression may cause distortions in the sound.
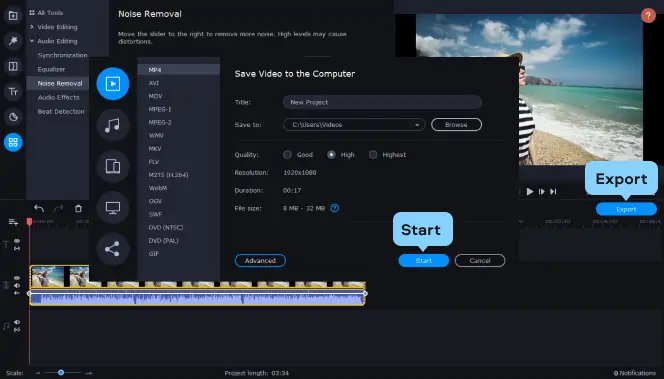
Step iv. Export the consequence
Information technology's time to salvage your fixed-upwardly file. Click Export and choose the format in which to salve your footage. Y'all can cull any popular video or audio format: AVI, MP4, MOV, MP3, WAV, WMA, etc. When you're ready to salvage, click the Starting time push button.
Now you know how to remove background racket from audio and video with Movavi Video Editor Plus. The reward of this software is that yous can clean up sound in just a couple of clicks. Install the software and try it out!


Movavi Video Editor Plus
Brand videos. Create. Inspire.
* The free version of Movavi Video Editor Plus has the following restrictions: 7-mean solar day trial period, watermark on the output videos, and, if you lot're saving a project as an audio file, an ability to salve just one-half the audio length. Larn more
How to utilise Brazenness to remove background dissonance
Audacity is complimentary noise reduction software for Windows, Mac, and Linux operating systems. The software lets you upload or tape audio and then edit information technology: add fade-in and fade-out, change speed and tempo, normalize the audio, reduce echo, and make the sound cleaner. The app's interface may look a bit disruptive for a beginner, but there are many tutorials online that will explain every attribute of the software in detail.
The main advantages of Brazenness are that it's free and has enough of sound-editing features. However, in that location are a few difficulties y'all can confront. Outset of all, you may need to install additional software to make the app open up your files. The virtually common requirements are FFmpeg and Lame. While opening a file in Brazenness, watch out for mistake letters – they should point out the software y'all need to install. Some other disadvantage is that even though y'all can import videos into the program, yous cannot consign them back every bit videos. So, you'll have to get a video editor to combine the new audio with the video file and erase the former audio track. Which ways, again, installing additional software.
Two options in Audacity remove background dissonance. The first 1 is via the Noise Reduction tool. It's the easier one because information technology requires less settings tweaking. Information technology's best for reducing continuous dissonance like street sounds and a fan turned on. In the video beneath, you'll come across how to get rid of background noise in Audacity using this tool.
The other pick you can employ is the Audacity Racket Gate tool. It'south more precise in removing unwanted noise, but it takes a niggling more than effort from you than the previous dissonance remover. It works best if the noise is most prominent when you're silent, due east. g., if someone is talking to you in the background or your neighbor is using a drill. Hither's how to remove background noise in Audacity using Racket Gate.
Footstep 1. Install and launch Brazenness
Go to the Audacity official website.
The Audacity website
Click Download Audacity, find the push for your computer's operating arrangement, then click an appropriate download link. Audacity has both an installable and a portable version. Depending on which 1 y'all've downloaded, either launch the installation file and go along with the installation or unzip the portable version and launch it.
In this guide, we're going to apply the Windows version of the software. In full general, the guide should piece of work for other operating systems, but mind some pocket-size interface differences.
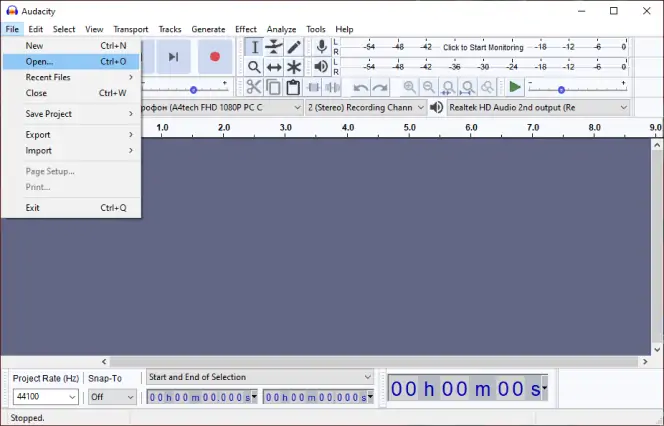
Step ii. Add together your file
Open the File menu and click Open up. Locate the file you desire to denoise and click Open.
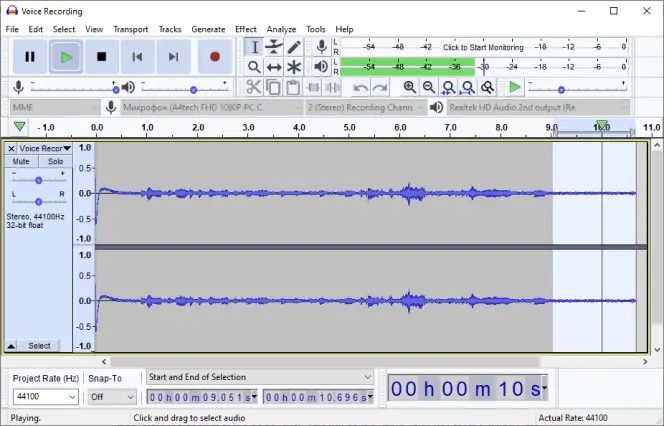
Pace 3. Use the Noise Gate
Noise Gate is a tool that sets the topline for the sound you desire to eliminate and reduces all the sound that'due south under this line to zero. To apply this tool efficiently, you lot need to notice the volume level of your background racket.
To do so, locate the moment at the recording that has only the noise in it. It can be a intermission between two sentences or the silence at the beginning or the end of the recording. Look at the Playback Level of this section and compare information technology to the Playback Level of the audio you desire to keep. Notation the decibel of the noise level. This volition be the value y'all'll use for the Noise Gate.
Select the entire recording using Ctrl + A. Open up the Effects bill of fare and select Noise Gate. Ready Gate threshold at the noted value and Level reduction at around -60 dB. Now click OK. Check out if the effect suits y'all. Acquit in heed that you tin can combine both noise reduction tools for a improve result.

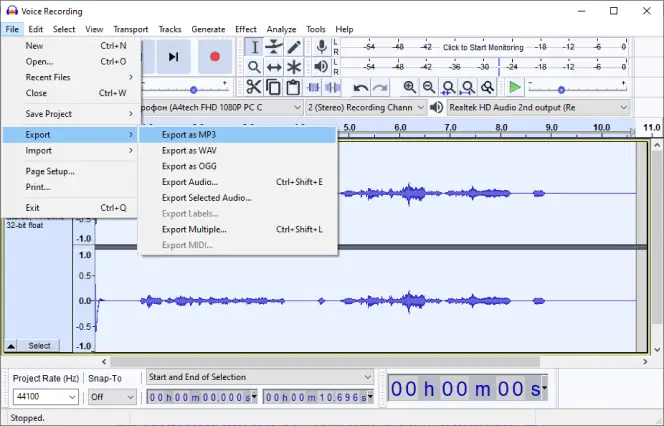
Step 4. Export the result
Click the File menu, hover over the Consign tab, and select 1 of the suggested formats. In the window that opens, select the destination folder, enter the new file proper name, and alter the format options if needed. After you lot click Save, the program will open ane more than window. Hither, y'all can enter meta information for the audio file. To skip, click OK. Now, the file is saved to your computer.
This is how you can remove background dissonance from a video using a free program. The final pace left is to join the footage and the new audio. At present, let'due south check out a tool you can employ to remove background noise from a video online.
How to use an online groundwork noise removal tool
To remove background noise from audio online, we suggest using AudioDenoise.com. Like Audacity, this software merely works with audio, so yous volition accept to combine the video with the edited audio with a video editor. The downside of this software is that information technology may be difficult to use: the settings are non intuitively understandable, you tin't bank check the event right afterward you change the settings – yous have to await for the website to process the changes. Even though Audacity'due south interface may be confusing for a beginner too, Brazenness has a lot of tutorials online, while AudioDenoise.com has none. The main advantage of the online dissonance remover is that you don't accept to install whatever software to use information technology. Only if y'all're not in the position to install programs, this tool should be able to help y'all remove background noise from your video or audio.
Permit'south go along with a guide on how to reduce background noise with this software.
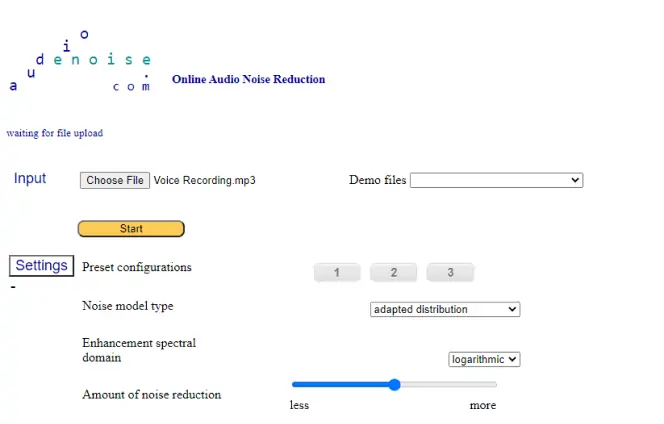
Step 1. Go to AudioDenoise.com
Step 2. Upload your file
Click the Cull File button, locate the file you lot want to edit, and click Open. When the file'south candy, click Beginning.
Since information technology'south online software, the processing speed will depend on the size of your file. If the uploading crashes or takes as well long, endeavor extracting the audio track from the video and saving information technology as an MP3 file. Then, endeavor uploading one time again.
Step 3. Gear up the denoise parameters
It's time to find the perfect settings. The software has three main presets; nosotros suggest trying them starting time. Select one of the preset configurations, click Process, and listen to the upshot. If y'all're non pleased with it, try a different preset or tweak the settings. After each alter, click Process and check out what's changed.
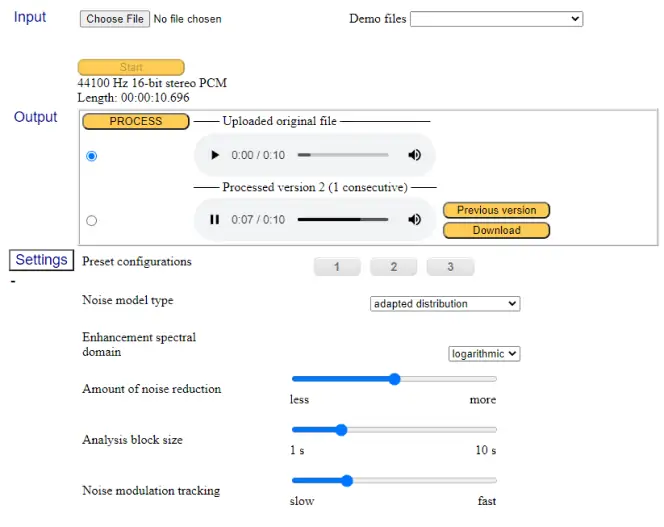
Step four. Download the result
When yous're satisfied with the sound, tick the processed version of the recording and click Download. The audio file will be saved to your default download folder.
Now yous know how to eliminate background dissonance online. Again, after downloading, you'll have to add the new sound track to the video with an editing plan.
Let'southward summarize everything said previously. There are many solutions on how to remove background noise from a video. All the same, free options generally require additional software like a audio extractor or a video editor. If you're keen on making videos and 1 of the problems you confront is background noise, we recommend getting a good video editor with an audio denoise feature. Try Movavi Video Editor Plus! Using it, you can make an enjoyable video without much effort.
Movavi Video Editor Plus lets y'all add titles and transitions, add background music and vocalisation-over, stabilize your footage, and reduce racket in a video. Download the software and try information technology out!
Movavi Video Editor Plus
Make videos. Create. Inspire.
* The costless version of Movavi Video Editor Plus has the following restrictions: 7-day trial period, watermark on the output videos, and, if you're saving a project every bit an audio file, an ability to save only one-half the sound length. Learn more
Frequently asked questions
How do I remove background noise from a video?
To remove background racket from a video, you demand to get advisable software. Here some of the options you tin apply:
- To reduce noise with Adobe® Premiere® Pro®, upload the video to the program, open the Audio workspace, plow on the Effects console, open the settings driblet-down menu, select Noise Reduction/Restoration, and click DeNoise. Open the DeNoise window and elevate the Amount slider to the position that makes the audio sound best. And then relieve the changes.
- To clear up sound with Movavi Video Editor Plus, open your video in the program, click Audio Properties, select Noise Removal, prepare the slider to a suitable position, click Use, and export the resulting file.
- To remove racket with Audacity, open the file in the program, open the Noise Gate window, gear up Gate threshold at the general noise level and the Level reduction slider at around -60 dB. Click OK and save the effect as an audio file.
- To denoise a video with AudioRemover, go to the software's website:
The AudioRemover website
Click Browse, select your file, and click Upload Video. Look for the website to process your video and then download the result. Now, add the de-voiced video to a video editor and add groundwork music or a voice-over.
How can I remove groundwork noise from a video on my telephone?
To remove background noise from a video on Android or iPhone, you'll accept to convert your video to an MP3 format, process the audio through a noise removal tool, and then combine the video with the new sound rails. For racket removal, y'all can utilise Lexis Audio Editor. Open the audio in the program, select the area you desire to edit, so open up the app's card, select Furnishings, and discover Noise reduction. Gear up the reduction parameters, tap Apply, and relieve the edited recording to your device. To add the new audio to your video, use a video editor, for example, Movavi Clips.
How do I remove groundwork noise from a recording?
Download and install Movavi Video Editor Plus. Open your video with the program, click the Sound Properties button, and select Dissonance Removal. Elevate the slider left or right depending on how loud the background noise is and click Utilize. When you're satisfied with the result, export the final video.
What causes video dissonance?
The corporeality of racket yous have on the recording mostly depends on the quality of the sound recording gear you're using. Every microphone produces hiss racket, simply because of the oestrus energy all the moving electrons create. Depending on the quality of the components the mic is fabricated with, you can hear more hiss or less. And so, to become rid of the groundwork noise, try getting a more expensive microphone. A cheaper alternative is using noise reduction software.

Source: https://www.movavi.com/support/how-to/how-to-remove-background-noise-from-video-and-audio.html
Posted by: austinmeir1941.blogspot.com
0 Response to "How To Clean An Audio File Of Background Noise With Audacity"
Post a Comment